Sunday, July 4, 2010

Feeling Felty

Hi there,
I haven't written for a while, probably because I haven't had any crafty news to share... until now!

My first introduction to needle felting was a few years ago, in a workshop for making a witch -


Needle felting

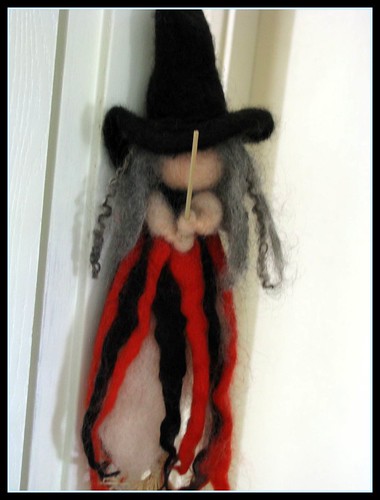
Needle felting is the process of using a special shaped needle to make felt out of wool. As you can see, some parts of my witch are more tightly processed than others.
Anyway, this is the only project I made using those materials and tools, up until this week.

Last Thursday, I participated in a workshop by shukpuck - we made a felted bunny!
I took some photos during the process, so you could appreciate the work better :)

This is how it all started, white wool -

Using our fingers and the needle, we created those shapes, you can also see the needle back there -


Attaching the head made a huge difference, and on the back you can see a nice lady working on her bunny -  


So, without further ado, meet my new bunny and my second felted creation ever -

That was a very fun creative evening!
Noa

Sunday, June 6, 2010

My First Curtain Ever!


It's really late here, time to go to bed. But I am so excited to write about the curtain I made today, that I want to share it here first (though I only have one reader and he has already seen it...).
Anyway, I helped designing the room of little baby Ella and the chosen colors are pink and green.
With the help of her mother, I drawn a tree with flowers on the wall. I don't have a good picture of the wall yet, so you will just have to trust me on this.
And today I completed my part of the deal (well, not entirely,  I still need to make big strawberries stuffies) and made the curtain! I tried to keep it simple, so I used white and dotted light green fabric. I've also added a pink heart at the bottom and a ribbon to tie it if you are in a sunny-mood.


Taking the photos was not a simple task, but with roy's help I am quite pleased.
Zoom in so you can see the loops and the fabric. I've also added two decorative lines, as I saw in a shop and really liked it.  


And a zoom of the bottom -


And look how cute it is when you tie it!


I am pleased with the outcome, hope that Ella's parents will be pleased with it as well...

Here and here you can find online tutorials on how to make curtains, though I must admit I haven't used any of them for my curtain.

Fabric used: "Badim lemetzvim", Nahalat Binyamin.
Good Night,
Noa

Monday, May 31, 2010

Elephant Frenzy

There are some animals that I believe are so cute in the cartoon world, maybe even cuter than in real life. An elephant is just one of those animals. Since I am not so good at drawing, sewing them is the easiest way to get my hand on one, or two, or five!

The first elephant was just hand drawn by myself, so unfortunately it came out looking more like an anteater  -

The second one is based on a free pattern I found online, but I am not sure where...

The next two colorful creatures are based on the same pattern  -


And one is made of a pattern from the last-minute patchwork + quilted gifts book -


The last one is made from an old (but clean!) sock, and though I will blog about my few attempts in sock dolls in a future post, here is the sock-elephant.


So, I made 6 elephants up until now, but I only own 4 of them. The fourth one I gave to cute little Neta and the sock-elephant is now entertaining the kids at my aunt's kindergarten. I think I'm ready to start my own zoo...

Have a frenzy day,
Noa

Sunday, May 30, 2010

Greetings All Around

As I mentioned in my first post, I love paper! I love the colors, I love the texture, I love the variety! However, scrapbooking a full-size100+ pages album is just no something I can challenge myself with, so greeting cards for me is the perfect excuse for fun colorful play with paper.

From time to time I try to make one that fits a challenge or two, like this one here -
celebrate!  in orange & blue

I made it for a basic grey challenge. The theme was animals, so the bird and the little butterflies on the fabulous paper fitted perfectly.
Here is another one, made for color challenge  and I've even won a springy stamp set!


I am not sure if the receiver of the cards has any idea how much thought was put into it, but as long as I enjoy making them that is fine...
 
You can see my full collection of past greeting cards right here.

Take care,
Noa

Saturday, May 29, 2010

Upcycles Like a Glove

Using everyday simple stuff and upcycling it into cool unique items is lots of fun!
About 3 months ago I participated in a workshop for making dolls out of... gloves! The workshop was guided by the amazing Ayula from make my day blog. Turning a characterless object into a vivid unique doll felt very rewarding.

Meet my punk roaster - 

And his doggy friend - 


And here they are playing  with a (non-glove) monster friend -
  

Making them is really simple, as you are using the basic shape of the glove to create the body, and the fingers for the hands, legs and tail.

Here are a few links for doll-glove tutorials:

Enjoy your weekend,
Noa

Friday, May 28, 2010

First Post, First Try

I am very excited to start my own blog and share my crafty attempts with you.
I've been crafting ever since I can remember and I love to try new things!
I love paper, scrapbooking, sewing and I've also tried polymer clay, beading, felting, knitting and paper mache.
As my main inspiration are ideas and creations I see and read online, I will try to accompany my posts with relevant and fabulous links and references so you could enjoy the crafty web I encounter daily.
My last crafty attempt is felt food! I love felt as it so easy to work with and a really forgiving fabric, so you can improvise with no fear. I've already made a few things using felt but this is the "biggest" project I've ever made with it. I made a pizza-and-sandwich set for the 4th birthday of my cousin's daughter.


Though I simply hand-drawn the food shapes, there are many tutorials available around to follow. Here is a post with many of them and a link to a flickr group about this subject.

I've also made a small bag so she could carry it around.


The bag is so easy to make – I used a plastic tablecloth so I wouldn't have to worry too much about the edges. I cut a rectangular shape and sewn a path for the shoelace at both sides. Then, I folded the rectangle on the left side and sewn along the sides. I turned it right side out and inserted the shoelace. That is it!


A last minute update - I've added pasta!


Hope you enjoyed this post,
I will be back soon with my next project!
Noa